Blog Archives
SmartCloud Tip #8: When Person Docs don’t synch
I have encountered occasions in a hybrid environment where some person documents don’t appear in SmartCloud so they are not available for addressing mail and are not available for provisioning, as in the case of creating a new user. The issue turned out to be that the entry in the Manager field on the Home/Work tab of the person document contained a long string of characters (about 40). This prevented the document from getting synchronized with the directory in SmartCloud. SmartCloud is designed so to avoid other problems, if there are any fields that can’t be synchronized, the whole document doesn’t.
So if names in your Domino Directory don’t appear in SmartCloud, review the fields for any unusual content that may be preventing it from synchronizing properly.
SmartCloud Tip #7: Notes BUILT-IN tool for migrating to SmartCloud
Want a simple method for migrating mail to SmartCloud? Maybe you are interested in moving to a Service-Only configuration, but were told you couldn’t migrate the data? Maybe you already completed a migration in a hybrid environment only to find one mailbox that was missed and needs to be migrated after the migration specialist is gone?
This process is embarrassingly simple and could make migration tools obsolete, at least for smaller environments. This puts self-service migrations in the hands of the end user. It could eliminate many billable hours transferring mail for Certified Data Transfer Managers (DTM) like myself. But I believe in things like Open Source software and Sharing Knowledge for the greater good.
Use Archiving. It’s that simple.
The steps are so easy an end user could do it. Here are the details:
Overview:
Adjust the ACLs of the mail files as necessary.
Create local replicas of the old mail file and the new mail file.
Setup Archive settings in the old mail file to archive into the local new mail file.
Archive Now. (This step will delete everything from the local replica of the old mail file, so don’t let it replicate back to the server in case you need it for some reason.)
Replicate the new mail file back to SmartCloud.
Review the old mail file to ensure all documents were archived.
The details:
1. If you are going to switch to a Service-only environment, you will be getting a new Notes ID. Make sure it has access to your old mail file. This step may need to be done by the system administrator.
2. Open your old mail.
3. Create a local replica of it. It Must not be encrypted. If you already have a local replica that is encrypted, you will need to make a new one.
4. Uncheck the box on the replicator page to replicate it. This will keep it from replicating the deletions back to the server after you archive.
5. Repeat steps 2,3, & 4 for your new mail file in SmartCloud.
6. Open the local replica of your old mail file.
7. Pull down Actions – Archive – Settings…

8. Click on the Criteria tab. Disable any criteria that have a check mark indicating they are enabled.
9. Click the Create… button.
10. Enter a name for this criteria, something like “Move to SmartCloud”.
11. Check the box to Enable this Criteria.
12. In the field to select what should happen, browse to and select the local replica of your new SmartCloud mail file. The dialog will look like this:

10. Click the Selection Criteria button.
12. Leave the setting to “not modified in more than”, and change the period to 0 days.

13. Click on OK to all of the boxes. If the following dialog pops up, click yes.

14. The Scheduling settings will be displayed. Click OK without enabling the schedule.

15. You are now ready to perform the archiving. From the inbox of your old mail file, Pull down Actions – Archive – Archive Now.
16. When it is complete, you can check the document count in the database properties. It should be close to zero.Check the All documents view and in your calendar check the Lists – Calendar Entries view for documents that didn’t get brought over. It may be easiest to just re-create calendar entries.
17. Review the folders and calendar in the new mail file. When you are satisfied with the documents in the new mail file, go back to the replicator page and enable it so it can replicate to the SmartCloud server.
That is the whole process in a nutshell. There are some potential obstacles, like connection speed to the Internet, mail file size and Private folders. Also, you may also prefer to have someone with experience to turn on and configure your SmartCloud environment and address some other architectural details, but the act of moving your data can be incredibly simple. I have helped companies use this method very successfully. If you want help with the process, contact me at Divergent Solutions.
See the full list of tips HERE.
SmartCloud Tip #6: Dealing with Middle Initials
In a Hybrid SmartCloud environment, if you have users in SmartCloud who have a middle name or middle initial, that information does not get added to the SmartCloud directory automatically as there is no middle name field. It shows up in the IBM SmartCloud Notes area, but not in the User Accounts area under Manage Organization. So how do you deal with this? The process is actually very simple.
1. Find the user under Manage Organization – User Accounts.
2. Click on the name to edit it.
3. In the Given name field, after the person’s name, add a space and the middle initial or middle name as it appears in their person document in the directory.
4. Click Next to page through the settings until you get to Finish. (Click on Account Login to jump to the last page of settings and save a few clicks.) You’re done.
So what if you need to do this for a lot of people, in particular, during a migration? In this case, use the Integration Server Service. Again, a straight-forward process.
1. Create a view in your Domino Directory that looks like this:
![]()
The three columns should have the following headings spelled exactly as they appear here, and formulas:
emailAddress –> Field: InternetAddress
Action –> Formula: “update”
givenName –> Formula: @Trim(@Implode(@Trim(@Subset(FirstName; 1)); ” , “)+ ” ” + MiddleInitial)
You can add additional fields to update if you so choose. Just be sure to follow the rules defined in the SmartCloud documentation.
2. Open the view you just created and select the documents that you want to update the middle initial in SmartCloud.
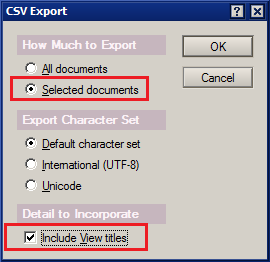
3. Pull down File – Export. Choose a file type of Comma Separated Value and name the file according to the rules for the Integration Server. Select Save.
4. Choose Save Selected and Include View Titles.
5. Process the .csv as described in the documentation.
I think this process should not be necessary at all, but until the directory in SmartCloud has and uses the middleInitial field from your Domino Directory, this tip is essential.
See the full list of tips HERE.
Quick Tip: Using the “like” feature in IBM Connections for more than just liking a file
The Like feature in IBM Connections is a great way to show you “Like” a file that has been posted. But don’t get caught up in the mindset of Facebook “likes”. This feature can also be a shortcut for a document review cycle. Instead of creating todos in an Activity and assigning it to each person, you can just send them all the link and ask them to “Like” it when they finish their review. Sounds almost too obvious, but I see people overlooking shortcuts like this often. This applies to the “home” edition of IBM Connections as well as in IBM SmartCloud Connections.


How to download and install the IBM Connections plugin for IBM Lotus Notes
(New versions of these plugins are now available. Read here.)
Summer vacation is over. I was deliberately taking a break from my blog to enjoy the fantastic summer and give focus on the business. While I was quiet on the surface, I’ve been very busy in the background. More on that later, but for now, some useful content…
IBM Connections with Sametime is amazing. It’s like a useful combination of features you will find on Linkedin, facebook, WebEx or GotoMeeting, Skype, dropbox, wordpress and IdeaJam and it’s ideal for any business larger than 1 person. And it is no more dependent on your email client than any of those apps are. But if you use IBM Lotus Notes, as many Connections customers do, you will get even more value with your Notes client by using the IBM Connections Plug-ins for IBM Lotus Notes. There is a version for Windows, Mac, and Linux. So where do you find this cool plug-in? How do you install it? Here are step-by-step instructions. And while you’re in the application catalog, be sure to look around at the other useful plug-ins, like the IBM Connections Desktop Plug-in for Microsoft Windows, or the IBM Connections Widget interface to LinkedIn. Have an iPad? Cool. Be sure to go to the App store and search for the IBM Connections app. In some ways I find it even better than the website. Here is a screen shot of the app. It will give you an idea of the features in IBM Connections:

IBM Connections app for iPad
Now here are the instructions for getting the IBM Connections plug-in for IBM Lotus Notes:
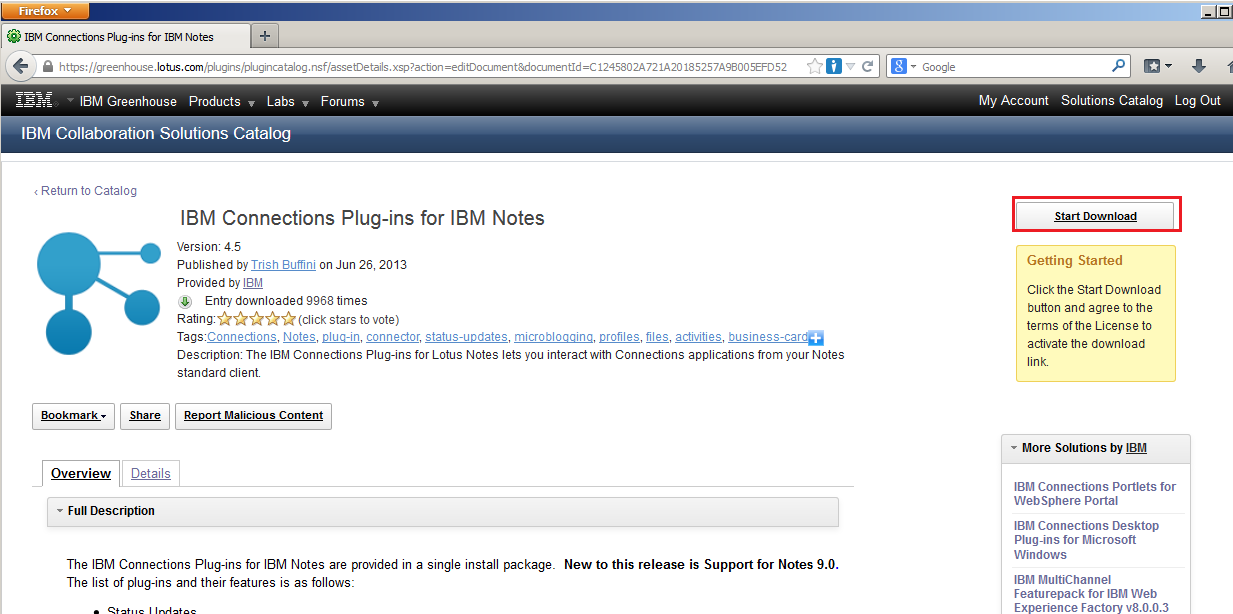
1. Click on this link: http://greenhouse.lotus.com . The following website will appear:

(Addendum: If you don’t already have a Greenhouse account, go ahead and click the Sign Up link now and get the process started. You will need an account before you can complete the download. Among other things it will prompt for an IBM contact. If you don’t have one, mention me and this article. They use this to validate accounts as real people.)
2. Click on the link for the IBM Collaboration Solutions Catalog. Info about the catalog will appear:

3. Click on the Launch button. The Catalog will appear. At this point you can click on the Most Popular tab and you will probably find the plug-in at the top. (it’s very popular)

3a. If you don’t find it at the top of the Most Popular list, you can select IBM Connections in the product list.

4. Click IBM Connections Plug-ins for IBM Notes. The description page will appear.
5. Click on Start Download in the top right corner of the page. The License Agreement will pop up.

6. Click I Agree. The download button will now appear in the top right corner.

7. Click the icon to download. It will prompt for where to save the file in the usual way depending on your browser. (These screen shots happen to be in Firefox.) The file is about 80 MB.

8. Once the .zip file has downloaded, unzip it. You will find it contains 3 zip files, one for each supported operating system.

9. Unzip the one you need and run the installer as per your OS. For Windows it is setup.exe. When the installer runs, it may prompt to be trusted. Click Yes. Then the language option appears.

10. Choose the language and click OK. The installer will run.

11. Click Next. The license agreement will appear.

12. After printing and reading the agreement and getting written approval from your legal department, select to accept the license agreement and click Next. It will remind you that Notes must be closed before continuing.

13. Close Notes if it is open and then click Next and then click Install. The installer will take surprisingly long considering how small it is. Be patient.

14. Launch Notes. Pull down File – Preferences. Click on the Connections section.
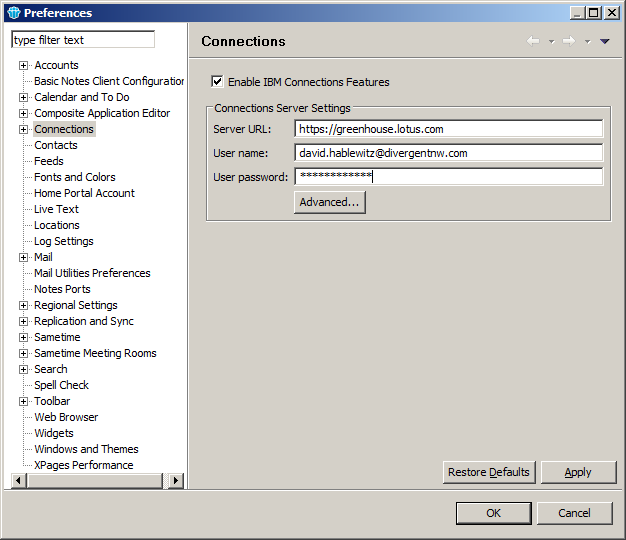
15. Fill in the info for your Connections server. If you want to test it out on Greenhouse to see everything it can do, enter the server URL of https://greenhouse.lotus.com and use your username and password for your Greenhouse account. (You should have had to create one before you could download the plug-in. Don’t have one? Go back to that browser window where you downloaded the plug-in and click Sign Up in the top right corner.)
16. Click on Status Updates, Files or Activities to expand the section and see content from Connections. Note that when it is first expanded it may take a bit longer to load the content. So be patient.

That’s it. Be sure to search for me in Greenhouse and connect with me there and I can share some communities and activities I have already made to demonstrate how they work within connections. And don’t forget to go back and browse all the other cool apps at Greenhouse as well as the iTunes app store for iPhone/iPad apps on Connections, Sametime, and more!
Let me know if this was helpful. I am considering doing these as a video. Would you prefer that format over an article?
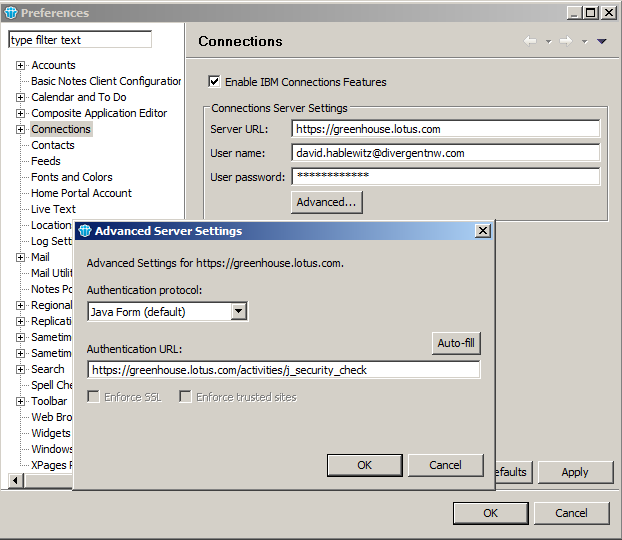
ADDENDUM: If you get the following error:
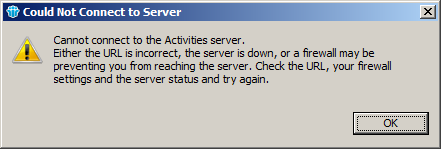
Then recheck the User Preferences. Click on the Advanced button and make sure it is using the Java Form with the authentication URL of:
https://greenhouse.lotus.com/activities/j_security_check
If that doesn’t fix it, there are several knowledgebase articles on the topic. Search for that error message to find them.
Lotus Notes Quick Tip: Hold the Ctrl key while opening a different view to jump to the same document in that view
Mat Newman’s tip about a clever use of categories reminds me of another useful but little-known feature. First, put the focus on a document in a view (click once on it.) Now hold down the control key and click on another view or folder where that document also exists. The view will be opened with the focus on that same document rather than where it was the last time the view was opened. One example of how this is useful is if you want to see other documents that are related and appear near the document in the other view. For example, in your mail file, find a document in the All Documents view. Now hold down the control key and click on the folder where it is filed. Another valuable effect is that if the document doesn’t exist in the second view, the view will be opened in the same place it was when last opened, so you can tell that the document doesn’t exist in the view.
Another place that this used to be helpful was in the help files. If you found a topic in a search, you could switch to the Table of Contents view and it would jump to that same document so you could read all the related documents in the chapter. Unfortunately, that broke with the new navigation format of Help.
The dirty little secret hiding in your Domino Directory
Your Domino directory may be filled with the Lotus Notes equivalent of bedbugs and you would never know it. They appear in the form of documents that don’t belong, but don’t appear in any views.
Occasionally, someone with rights to create documents in your directory will accidentally click paste or Ctrl-V when they shouldn’t have. Perhaps they were in the wrong database when they did it or maybe they meant to cut or copy instead of paste and the clipboard happened to have a Notes document in it when they did. Now a new document is in your directory that shouldn’t be. The problem is that unless the document that was pasted fits the selection criteria for a view, you’ll never see it.
The solution is simple. Create a view in the Domino Directory. I like to copy from the people view. Edit the design of the view and change the selection formula to be Select @All. Add a new first column to the view. Make the value the field called ‘Form’. Sort it and categorize it. You may want to put this viewt in your list of custom admin views if you have any. Open the view and collapse all. Look for any form names that don’t seem right for the directory. Below is a screen shot of a directory with most of the documents you should expect to see. If you see any form names like Memo orJournalEntry, you can be sure the document doesn’t belong.
I have come across some directories that have been around for a long time that had hundreds of junk documents. While it isn’t the end of the world, it is much better to have a clean directory.


